Sure, why not? You may think soup is just for the cooler months, but even if you aren't interested in the wonderful array of cold soups available in summer (gazpacho, cantaloupe, pea and mint, just to name a few!), there are plenty of ways to whip up a pot of comforting, soothing warm soup in summer without sending the heat index through the roof. One of my favorites is a simple miso soup with root vegetables and greens. Miso soup is light and brothy and won't weigh you down, and yet by virtue of the fact that it is made with miso paste, seaweed, and often root vegetables, energetically speaking it is incredibly grounding and stabilizing- and that's some energy we can all use in the busy, active summertime. This is the perfect thing to make for someone who is on the mend either from an illness or a surgery (the firming, contracting energies of these ingredients actually help us to "come back together"), and is also just the ticket on a day when you need something soothing, relaxing, and comforting- perhaps after an active and busy day of running around engaging in summer fun, or to counteract a recent indulgence in sweets or alcohol, both of which are refined therefore energetically create a spike and crash in the body's energy, making us feel uprooted and unstable as opposed to grounded and steady. To benefit from all of that grounding energy while also keeping things light and relaxed, I like to add a few handfuls of chopped greens to a miso soup, which provide an uplifting energy that is flexible and expansive yet mellow and balanced. To make it a complete meal, simply add a protein such as cubes of tofu or tempeh or pieces of mild white fish, and serve it alongside some cooked brown rice or other grain or with some nice crusty whole grain bread. Follow the recipe below for a mellow, comforting soup that will soothe your heart and soul without overheating you this summer!
3-4 cups fresh water
1- 1 1/2 tablespoons miso
2 medium carrots, scrubbed and sliced into thin rounds
1/2 medium daikon radish, scrubbed and cut into thin half-moons or quarters (if daikon isn't available, use regular red radish chopped into thin rounds)
1/2 large sheet of kombu seaweed, torn or broken into small pieces (if the seaweed is tough, soak for 10 minutes and drain beforehand)
2-3 handfuls of kale or collard greens, washed well and chopped into thin slivers
1/2 block tofu or tempeh, cut into small cubes OR several ounces mild, flaky white fish (optional)
several shiitake mushrooms, fresh or dried, chopped into pieces or thin slices (optional)
1 tablespoon unrefined sesame oil (optional)
Bring water to a boil, then add all ingredients except for miso and kale/collard greens (including . mushrooms and tofu/tempeh if using- if using fish, do not add yet). Turn down to medium-low heat, cover, and simmer for 15 minutes until broth has become fragrant and root vegetables and seaweed are becoming tender. If using fish, cooked white fish or thin pieces of raw white fish can be added at this point to this lightly bubbling broth- simmer until fish is cooked. When all ingredients have cooked, add leafy greens and continue to cook covered on medium-low heat only a few more moments until the greens wilt and become tender.
At this point, turn off heat completely, and with a ladle or cup remove a small amount of the hot broth into a cup or small bowl. Dilute the 1 tablespoon of miso into this removed broth, mix and mash well to dilute completely. Then add this diluted miso and broth back into the pot and stir, so that all flavors combine. The reason for this step is that the miso will not dilute well if added directly to the larger amount of broth and vegetables. Taste the soup and add a little more miso using the same dilution method if a stronger, saltier taste is desired, remembering not to add too much- miso is a powerfully healthful ingredient meant to be used in small doses. Once the miso has added, do not ever bring the soup back to a boil as it will destroy the positive active bacteria that a great health benefit of fermented miso. The soup is now ready to serve, and if serving this as a main meal, I like to add a light swirl of unrefined sesame oil and mix throughout in order to impart some healthy fat and depth of flavor to the soup- skip this step if serving this soup with other, richer or fattier dishes in a meal or if serving it as a simple appetizer.
Either bolstered with some protein and served alongside some fluffy brown rice as a full meal, or enjoyed in its simplest form as a light vegetable soup, this soup is sure to make you feel good all over- and it is the perfect balancing note for a busy, celebratory summer holiday! Eat up and enjoy in good health!
Interested in finding out more about what foods are right for your own body and why? Looking for personalized information and support to help you change your eating and lifestyle choices in order to achieve your own specific goals for health and wellness? Contact me to set up a consultation: erica@wellnessrealized.com
Showing posts with label nutrition. Show all posts
Showing posts with label nutrition. Show all posts
Wednesday, June 29
Thursday, May 26
Balancing the Plate: Inspiration for Healthy, Easy, and Balanced Meals
After my last post about the importance of maintaining balance, it's a perfect time to talk about how the idea of balance applies to structuring meals. Don't worry, this isn't going to be a boring step by step tutorial or a set of stifling rules for how your meals must be composed in order to be healthy- rather, it's a look at how easy and simple it can be to throw together a healthy and delicious meal without a lot of effort or forethought, simply by following some basic guidelines.
Much in the same way that we need to maintain balance in our lives by prioritizing supportive and beneficial practices of self care that keep us healthy, happy, and grounded, we also need to maintain balance on the plate in order to create a healthful, stable, and flexible condition in the body. We need nutritious, wholesome, natural foods in combinations that provide our body with the necessary nutrients in proportions that allow our body to maintain balance in order for us to be healthy, strong, and functioning optimally. The point here is to get your nutritional needs met without having to spend all your time strategizing, and to do so in a way that's pretty easy, super tasty, and flexible enough to keep things fun and interesting.
Some of you may be familiar with the term Macrobiotics and the school of thought and practice that it describes. Most people who are casually aware of it think of it as a dietary system, but it extends beyond that into a way of life. People harbor all kinds of preconceived notions about macrobiotics, from the good to the bad, often settling on an assumption that it is a super-restrictive and "clean" way of eating that allows for little more than brown rice and vegetables. But the truth is that the main principle of macrobiotics is all about Balance, not restriction. It means the food we eat is chosen in a way that balances the conditions in the body to allow for optimal digestion, assimilation, nourishment of our organs and bodily systems, and that creates physical, emotional, mental, and energetic harmony. While there are general guidelines that apply broadly, it is a system that can be and should be modified and personalized depending on the individual needs of the person and the situation they're in; and the most important and always constant part of the approach to eating is the reliance on natural, wholesome foods in the appropriate proportions to create and maintain balance.
But this post isn't about teaching you how to be macrobiotic or encouraging you to be, although I will happily teach you how to implement macrobiotic principles into both your diet and your life if you are interested. Rather, this post is to help you and anybody out there to adapt principles of balance into planning and creating wholesome, natural meals in a way that is intuitive to you but also easy and fun. Being that I began my training in nutrition specifically with a focus on macrobiotics and it is still one of the main schools of thought that informs my approach, much of my cooking style has developed based in the general principles of macrobiotic philosophy, specifically the emphasis on a plant-based, natural diet of wholesome and unprocessed foods combined in ratios that are supportive of the body. But I am also a modern person living in the real world, in New York of all places, and I believe in flexibility and being realistic and being free to do what feels good, while always keeping one's intutive sense of one's individual needs at the center of one's awareness. And I know that my clients have varying needs, desires, physical make-ups, and schedules, so rather than give them "rules", I teach them how different foods work in the body and what foods and proportions create and sustain optimal health and balance, while encouraging them to allow for creativity, flexibility and the dictations of their own needs all while working within health supportive guidelines.
To help you with the inspiration side of things and to give an idea of how a healthy meal comes together, the following are descriptions and pictures of the kinds of meals that I cook for myself and my family, the meals and foods that I teach my clients how to prepare and eat; and the idea is that you take the ingredients and combinations presented here and think of them not so much as a recipe but as a guide for creating these meals using the inspiration presented and then using them as jumping off point for creating your own new combinations for future meals. You'll notice that many ingredients appear several times or even frequently but in different variations or combinations; this is because I rely on certain healthful standard choices in my meal preparation (unrefined sesame oil, extra virgin olive oil, certain whole grains) and also because this is a sampling of what I cooked over a particular period of time, meaning it reflects different and interesting combinations of the foods I had in the kitchen at that time, rather than requiring a large array of different ingredients. This will help you to get in the habit of smaller shopping trips, cooking for more than one meal at a time, and then using what you make to create various different and satisfying meals; thus minimizing effort, time, and money. Get to cooking, and enjoy!
 As simple as it gets: a plate of brown rice, chickpeas (cook your own or use organic from a can), steamed green beans and steamed kabocha squash (which is like a small, dense pumpkin). This meal is complete with a healthy fat for flavor and nutrition, hence the homemade miso-tahini dressing to the right- simply mix a bit of tahini paste with a small amount miso paste and a few tablespoons of water until desired consistency is achieved, then drizzle all over the plate of goodness! This is a perfect example of the standard balanced meal, and the ingredients can easily be changed out for others from the same category.
 Brown rice couscous (or you could use whole wheat couscous) tossed with lightly sauteed carrots, onions, and baby golden beets, then mixed with raw spinach leaves into a room temperature salad dressed in a zesty olive oil vinaigrette. This idea can be made into many different variations by switching out the greens to arugula or watercress or another salad green, switching the grain to millet or quinoa, or throwing in some cubed avocado. To make this a more substantial and filling meal, simply top with some lean protein; either beans, lentils, or some grilled fish or other lean meat would be the perfect accompaniment.
 A side dish of grapefruit and avocado salad, made by combining peeled grapefruit segments (easily peel the clear skin away from each segment and toss into a bowl), cubed avocado, sliced scallions, and a very small amount of dijon mustard to taste. Mix well to combine all of the flavors, and serve as a breakfast or brunch dish with whole grain rye toast and soft boiled eggs, or serve over a beautiful bunch of salad greens such as mâche or mesclun as a side salad for lunch or dinner, alongside an entree of your choice.
 A simple but hearty breakfast: leftover brown rice warmed on the stove and tossed with cubes of steamed tofu, seasoned with basil, sea salt, and unrefined sesame oil. To make this a complete meal for lunch or dinner, simply add some green vegetables, such as either roasted broccoli or asparagus, or sauteed kale or collard greens with seasoning of your choice, or even a simple green salad.

An easy, scrumptious vegetable side: cauliflower and acorn squash cut into cubes and roasted with unrefined sesame oil, garlic, and a bit of turmeric to bring out the flavor. This could be served with any meal and seasonings of your choice, but to balance the hearty and rich flavors and textures of the roasted vegetables, I served this alongside a lighter entree of broiled flounder with a miso glaze over a bed of quinoa topped with sauteed bok choi in olive oil. Or, it would go very nicely with the simple and light tofu meal described above.

A typical macrobiotic meal, combined into one main dish: cooked chickpeas and brown rice tossed with cooked arame seaweed and lightly sauteed kale, then mixed with unrefined sesame oil and sesame seeds, and served with a side of carrots sticks and cornichon pickles. This idea can be used to create countless takes on the one-dish meal: you can use a different kind of bean or a different whole grain, skip the seaweed if you like, or add some fish or lean meat into this mixture instead of beans for protein. The idea is to keep the balance and ease, and have fun with it!

Here's an idea for a quick last minute meal: this mixture can be used as a filling for quesadillas, sandwich wraps or crepes, or can be folded into an omelet, stuffed into thin slices of lean meats (see below), or simply served over a bed of cooked whole grains as it is here. This is something you can make from items stocked in the freezer and pantry when you're short on fresh stock: simply combine cooked black beans, thawed and drained frozen chopped spinach, thawed frozen organic corn, garlic (fresh or powder), onion (fresh or dried), and chili powder, along with olive oil, and simmer over low heat until warm and flavors have combined, then add toasted sunflower seeds or pumpkin seeds. Then it is ready to be enjoyed on it's own with a grain, or added into your meal of choice.
 I enjoyed the mixture over some cooked whole grain polenta above (beans and polenta go very well together), and mixed the rest with leftover cooked quinoa and stuffed it into rolled thin slices of turkey for my husband's lunch, along with cut carrot sticks. (Read here about this lunch container and how ones like this can help you to save time, money, and effort in bringing lunch to work while encouraging healthy balance and proper portions.)
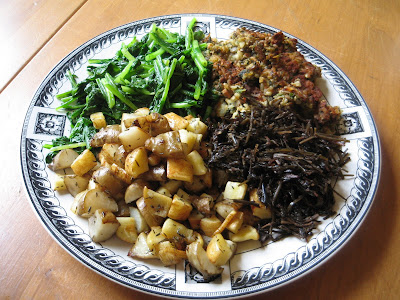 Here is a hearty, balanced meal of delicious goodness, clockwise from top right: a baked casserole made from cooked green lentils and cooked brown rice mixed with garlic, onions, chopped spinach, spices and herbs, and 1 beaten egg to hold it together and then baked in the oven; cooked arame seaweed dressed with a bit of unrefined sesame oil and rice vinegar; roasted parsnips and sunchokes (Jerusalem artichokes) roasted with unrefined sesame oil, thyme, and sea salt; and lightly sauteed watercress. This meal was DELICIOUS! Again, this is one you can take and run with- try your own casserole ingredients using whatever protein and grain you have on hand, or try different combinations of starchy and sweet vegetables for roasting. The seaweed is optional but provides a wonderfully healthful boost!

A light dinner: red lentil soup with kombu seaweed served with sauteed collard green ribbons dressed in unrefined sesame oil and sprinkled with sesame seeds, and a side of Mestemacher whole rye bread. I make various versions of red lentil soup all the time; another recent one contained chopped sunchokes (Jerusalem artichokes) and parsnips and was seasoned with nutmeg and thyme, a different one cooked with chopped carrots and sweet corn and seasoned with garlic, turmeric, cumin, and paprika. Be creative! Soup is pretty failsafe- lots of room for experimentation.

Cooked chickpeas and sauteed tatsoi (a bitter Asian green; you can substitute kale, collards, or bok choi easily) with unrefined sesame oil, caramelized onions, garlic, and fresh ginger, and lightly sauteed buckwheat sprouts thrown in at the very end of cooking (any kind of sprouts would work), served over fluffy cooked millet and topped with a drizzle of tahini dressing, with a spoon of sauerkraut on the side. This meal was sooo tasty!
 Sauteed tempeh (made from fermented soy beans) and watercress in unrefined sesame oil served with cooked black quinoa and thin-sliced red radishes. Black quinoa may be hard to find; you can easily use regular quinoa or red quinoa here, and since this is a very simple dish, season as you would like to pump up the flavor. If tempeh is not desirable or available, you could use tofu, a cooked bean of your choice, or a fish or lean meat of your choice.

Here's a version of one of my favorites, cabbage slaw. You can find my basic cabbage slaw recipe here, but I make this a bit different each time to keep it interesting and depending on what I have around. In this version, it's simply shredded Nappa cabbage, carrots, sweet corn, and toasted pumpkin seeds in a lemon juice and flaxseed oil dressing with a dash of sea salt. For my own breakfast, I served this with a scoop of fluffy cooked and seasoned millet as seen here.

For my husband's lunch, I filled thin slices of turkey breast with the seasoned millet and the served the cabbage slaw on the side, as seen here. Don't hesitate to use these meal ideas as a jumping off point for modifying them based on your own preference or needs, or for varying tastes of members of your family, as I did for us with this meal. Making a small change or addition in order to create two versions of one meal can be extremely simple once you get the hang of it. (Tiffins are very handy for transporting this type of balanced, three-part meal to work or elsewhere!)
 Here is another riff on the bean-vegetable-grain formula, which can be made in literally endless combinations and kept interesting by clever and creative use of seasonings such as gomasio and tekka, both macrobiotic/Japanese condiments used here, or simply having fun with whatever herbs, spices, and seasonings are in your own cabinets. Here we have aduki beans mixed with black quinoa and cooked kombu seaweed (optional) and seasoned with unrefined sesame oil, gomasio (sesame seeds ground up with sea salt), and tekka (a condiment made from ground root vegetables and miso), topped with white turnips that have been cut into matchsticks and simmered with a splash of water, unrefined sesame oil, and tamari (wheat-free soy sauce) until the liquid is absorbed/reduced, and accompanied by a simple salad of chopped mizuna greens dressed with flaxseed oil, apple cider vinegar, and a sprinkle of sea salt. If mizuna greens are not available or desirable, arugula or watercress would work perfectly with this meal and are both easy to find.
This last one I don't have a photo for, but it is so easy and simple that it doesn't need one: cooked brown rice pasta (any whole grain pasta will do, such as whole wheat pasta or quinoa pasta) tossed with fresh basil, cooked kidney beans, sauteed arugula, sweet peas, olive oil, and garlic. This is comfort food at it's best and easiest!
I am looking forward to hearing which ones you try and how you make them your own; remember, once you have the basic proportions for health and balance in place, it's time to be creative and have fun with it!
Interested in finding out more about what foods are right for your own body and why? Looking for personalized information and support to help you change your eating and lifestyle choices in order to achieve your own specific goals for health and wellness? Contact me to set up a consultation: erica@wellnessrealized.com
Much in the same way that we need to maintain balance in our lives by prioritizing supportive and beneficial practices of self care that keep us healthy, happy, and grounded, we also need to maintain balance on the plate in order to create a healthful, stable, and flexible condition in the body. We need nutritious, wholesome, natural foods in combinations that provide our body with the necessary nutrients in proportions that allow our body to maintain balance in order for us to be healthy, strong, and functioning optimally. The point here is to get your nutritional needs met without having to spend all your time strategizing, and to do so in a way that's pretty easy, super tasty, and flexible enough to keep things fun and interesting.
Some of you may be familiar with the term Macrobiotics and the school of thought and practice that it describes. Most people who are casually aware of it think of it as a dietary system, but it extends beyond that into a way of life. People harbor all kinds of preconceived notions about macrobiotics, from the good to the bad, often settling on an assumption that it is a super-restrictive and "clean" way of eating that allows for little more than brown rice and vegetables. But the truth is that the main principle of macrobiotics is all about Balance, not restriction. It means the food we eat is chosen in a way that balances the conditions in the body to allow for optimal digestion, assimilation, nourishment of our organs and bodily systems, and that creates physical, emotional, mental, and energetic harmony. While there are general guidelines that apply broadly, it is a system that can be and should be modified and personalized depending on the individual needs of the person and the situation they're in; and the most important and always constant part of the approach to eating is the reliance on natural, wholesome foods in the appropriate proportions to create and maintain balance.
But this post isn't about teaching you how to be macrobiotic or encouraging you to be, although I will happily teach you how to implement macrobiotic principles into both your diet and your life if you are interested. Rather, this post is to help you and anybody out there to adapt principles of balance into planning and creating wholesome, natural meals in a way that is intuitive to you but also easy and fun. Being that I began my training in nutrition specifically with a focus on macrobiotics and it is still one of the main schools of thought that informs my approach, much of my cooking style has developed based in the general principles of macrobiotic philosophy, specifically the emphasis on a plant-based, natural diet of wholesome and unprocessed foods combined in ratios that are supportive of the body. But I am also a modern person living in the real world, in New York of all places, and I believe in flexibility and being realistic and being free to do what feels good, while always keeping one's intutive sense of one's individual needs at the center of one's awareness. And I know that my clients have varying needs, desires, physical make-ups, and schedules, so rather than give them "rules", I teach them how different foods work in the body and what foods and proportions create and sustain optimal health and balance, while encouraging them to allow for creativity, flexibility and the dictations of their own needs all while working within health supportive guidelines.
To help you with the inspiration side of things and to give an idea of how a healthy meal comes together, the following are descriptions and pictures of the kinds of meals that I cook for myself and my family, the meals and foods that I teach my clients how to prepare and eat; and the idea is that you take the ingredients and combinations presented here and think of them not so much as a recipe but as a guide for creating these meals using the inspiration presented and then using them as jumping off point for creating your own new combinations for future meals. You'll notice that many ingredients appear several times or even frequently but in different variations or combinations; this is because I rely on certain healthful standard choices in my meal preparation (unrefined sesame oil, extra virgin olive oil, certain whole grains) and also because this is a sampling of what I cooked over a particular period of time, meaning it reflects different and interesting combinations of the foods I had in the kitchen at that time, rather than requiring a large array of different ingredients. This will help you to get in the habit of smaller shopping trips, cooking for more than one meal at a time, and then using what you make to create various different and satisfying meals; thus minimizing effort, time, and money. Get to cooking, and enjoy!
 As simple as it gets: a plate of brown rice, chickpeas (cook your own or use organic from a can), steamed green beans and steamed kabocha squash (which is like a small, dense pumpkin). This meal is complete with a healthy fat for flavor and nutrition, hence the homemade miso-tahini dressing to the right- simply mix a bit of tahini paste with a small amount miso paste and a few tablespoons of water until desired consistency is achieved, then drizzle all over the plate of goodness! This is a perfect example of the standard balanced meal, and the ingredients can easily be changed out for others from the same category.
 Brown rice couscous (or you could use whole wheat couscous) tossed with lightly sauteed carrots, onions, and baby golden beets, then mixed with raw spinach leaves into a room temperature salad dressed in a zesty olive oil vinaigrette. This idea can be made into many different variations by switching out the greens to arugula or watercress or another salad green, switching the grain to millet or quinoa, or throwing in some cubed avocado. To make this a more substantial and filling meal, simply top with some lean protein; either beans, lentils, or some grilled fish or other lean meat would be the perfect accompaniment.
 A side dish of grapefruit and avocado salad, made by combining peeled grapefruit segments (easily peel the clear skin away from each segment and toss into a bowl), cubed avocado, sliced scallions, and a very small amount of dijon mustard to taste. Mix well to combine all of the flavors, and serve as a breakfast or brunch dish with whole grain rye toast and soft boiled eggs, or serve over a beautiful bunch of salad greens such as mâche or mesclun as a side salad for lunch or dinner, alongside an entree of your choice.
 A simple but hearty breakfast: leftover brown rice warmed on the stove and tossed with cubes of steamed tofu, seasoned with basil, sea salt, and unrefined sesame oil. To make this a complete meal for lunch or dinner, simply add some green vegetables, such as either roasted broccoli or asparagus, or sauteed kale or collard greens with seasoning of your choice, or even a simple green salad.
An easy, scrumptious vegetable side: cauliflower and acorn squash cut into cubes and roasted with unrefined sesame oil, garlic, and a bit of turmeric to bring out the flavor. This could be served with any meal and seasonings of your choice, but to balance the hearty and rich flavors and textures of the roasted vegetables, I served this alongside a lighter entree of broiled flounder with a miso glaze over a bed of quinoa topped with sauteed bok choi in olive oil. Or, it would go very nicely with the simple and light tofu meal described above.

A typical macrobiotic meal, combined into one main dish: cooked chickpeas and brown rice tossed with cooked arame seaweed and lightly sauteed kale, then mixed with unrefined sesame oil and sesame seeds, and served with a side of carrots sticks and cornichon pickles. This idea can be used to create countless takes on the one-dish meal: you can use a different kind of bean or a different whole grain, skip the seaweed if you like, or add some fish or lean meat into this mixture instead of beans for protein. The idea is to keep the balance and ease, and have fun with it!

Here's an idea for a quick last minute meal: this mixture can be used as a filling for quesadillas, sandwich wraps or crepes, or can be folded into an omelet, stuffed into thin slices of lean meats (see below), or simply served over a bed of cooked whole grains as it is here. This is something you can make from items stocked in the freezer and pantry when you're short on fresh stock: simply combine cooked black beans, thawed and drained frozen chopped spinach, thawed frozen organic corn, garlic (fresh or powder), onion (fresh or dried), and chili powder, along with olive oil, and simmer over low heat until warm and flavors have combined, then add toasted sunflower seeds or pumpkin seeds. Then it is ready to be enjoyed on it's own with a grain, or added into your meal of choice.
 I enjoyed the mixture over some cooked whole grain polenta above (beans and polenta go very well together), and mixed the rest with leftover cooked quinoa and stuffed it into rolled thin slices of turkey for my husband's lunch, along with cut carrot sticks. (Read here about this lunch container and how ones like this can help you to save time, money, and effort in bringing lunch to work while encouraging healthy balance and proper portions.)
 Here is a hearty, balanced meal of delicious goodness, clockwise from top right: a baked casserole made from cooked green lentils and cooked brown rice mixed with garlic, onions, chopped spinach, spices and herbs, and 1 beaten egg to hold it together and then baked in the oven; cooked arame seaweed dressed with a bit of unrefined sesame oil and rice vinegar; roasted parsnips and sunchokes (Jerusalem artichokes) roasted with unrefined sesame oil, thyme, and sea salt; and lightly sauteed watercress. This meal was DELICIOUS! Again, this is one you can take and run with- try your own casserole ingredients using whatever protein and grain you have on hand, or try different combinations of starchy and sweet vegetables for roasting. The seaweed is optional but provides a wonderfully healthful boost!
A light dinner: red lentil soup with kombu seaweed served with sauteed collard green ribbons dressed in unrefined sesame oil and sprinkled with sesame seeds, and a side of Mestemacher whole rye bread. I make various versions of red lentil soup all the time; another recent one contained chopped sunchokes (Jerusalem artichokes) and parsnips and was seasoned with nutmeg and thyme, a different one cooked with chopped carrots and sweet corn and seasoned with garlic, turmeric, cumin, and paprika. Be creative! Soup is pretty failsafe- lots of room for experimentation.

Cooked chickpeas and sauteed tatsoi (a bitter Asian green; you can substitute kale, collards, or bok choi easily) with unrefined sesame oil, caramelized onions, garlic, and fresh ginger, and lightly sauteed buckwheat sprouts thrown in at the very end of cooking (any kind of sprouts would work), served over fluffy cooked millet and topped with a drizzle of tahini dressing, with a spoon of sauerkraut on the side. This meal was sooo tasty!
 Sauteed tempeh (made from fermented soy beans) and watercress in unrefined sesame oil served with cooked black quinoa and thin-sliced red radishes. Black quinoa may be hard to find; you can easily use regular quinoa or red quinoa here, and since this is a very simple dish, season as you would like to pump up the flavor. If tempeh is not desirable or available, you could use tofu, a cooked bean of your choice, or a fish or lean meat of your choice.
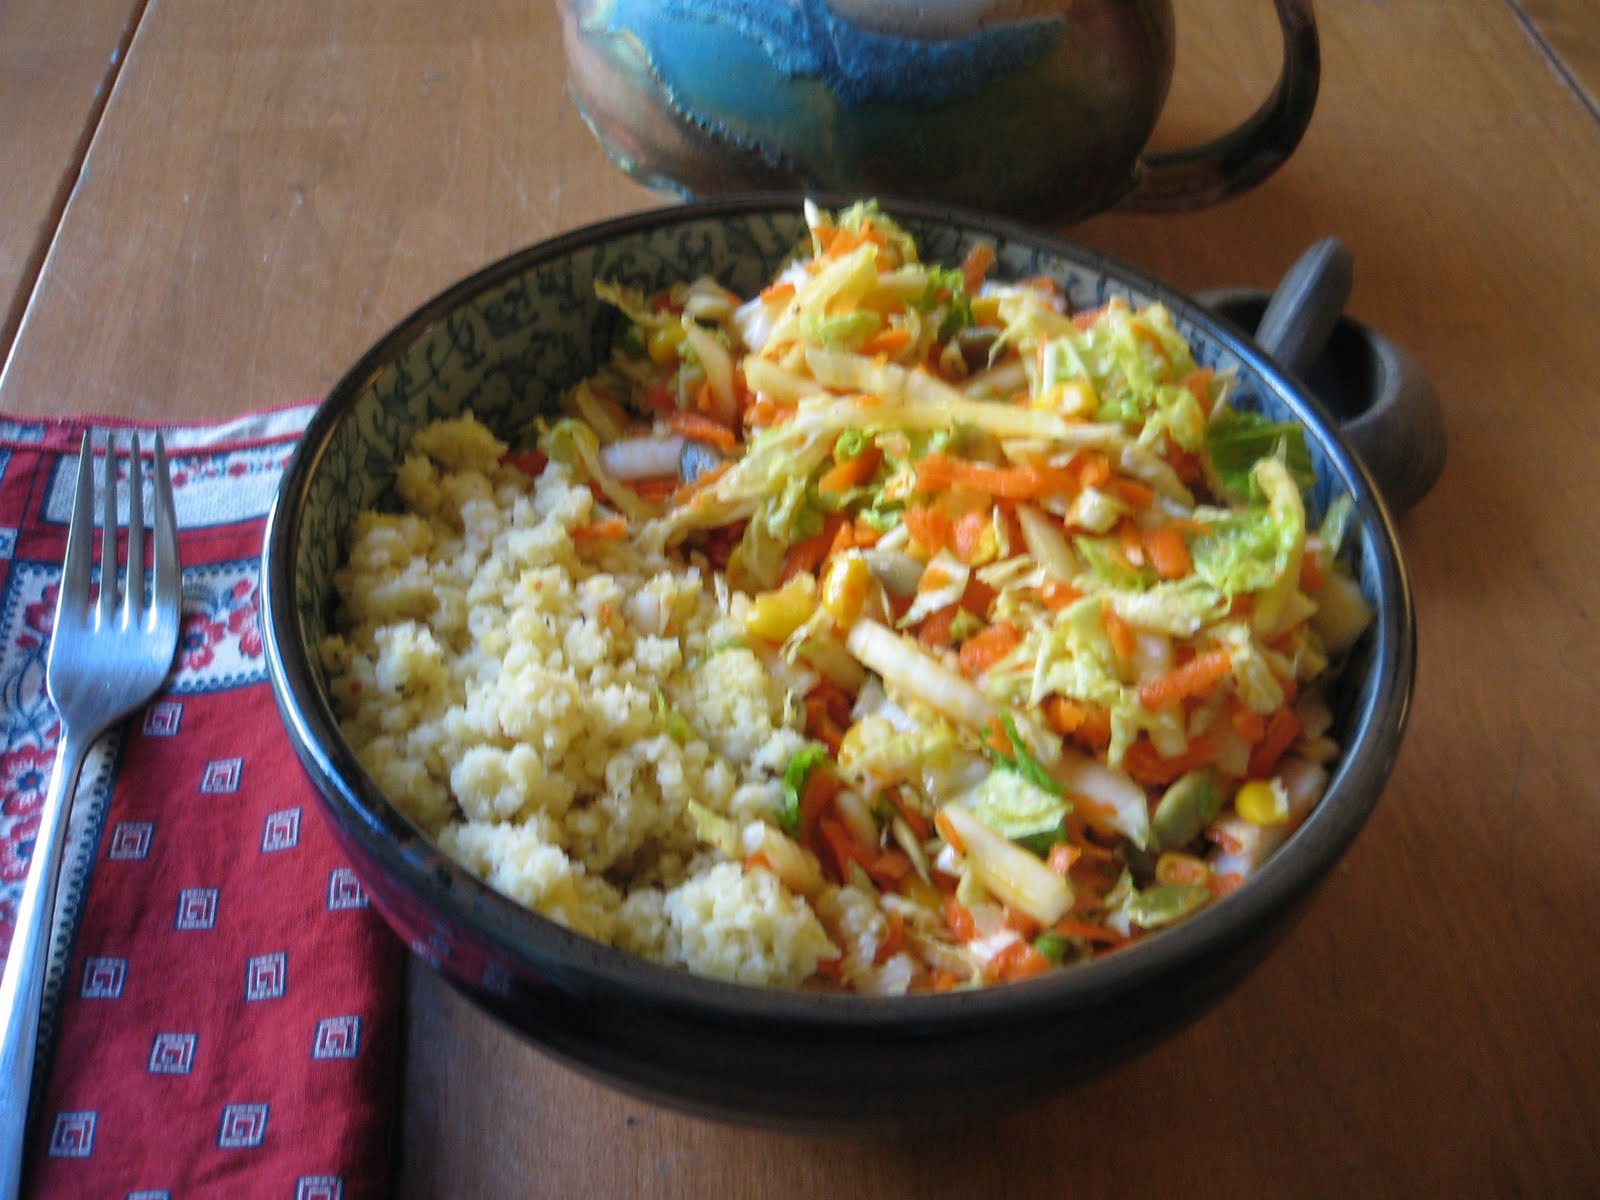
Here's a version of one of my favorites, cabbage slaw. You can find my basic cabbage slaw recipe here, but I make this a bit different each time to keep it interesting and depending on what I have around. In this version, it's simply shredded Nappa cabbage, carrots, sweet corn, and toasted pumpkin seeds in a lemon juice and flaxseed oil dressing with a dash of sea salt. For my own breakfast, I served this with a scoop of fluffy cooked and seasoned millet as seen here.

For my husband's lunch, I filled thin slices of turkey breast with the seasoned millet and the served the cabbage slaw on the side, as seen here. Don't hesitate to use these meal ideas as a jumping off point for modifying them based on your own preference or needs, or for varying tastes of members of your family, as I did for us with this meal. Making a small change or addition in order to create two versions of one meal can be extremely simple once you get the hang of it. (Tiffins are very handy for transporting this type of balanced, three-part meal to work or elsewhere!)
 Here is another riff on the bean-vegetable-grain formula, which can be made in literally endless combinations and kept interesting by clever and creative use of seasonings such as gomasio and tekka, both macrobiotic/Japanese condiments used here, or simply having fun with whatever herbs, spices, and seasonings are in your own cabinets. Here we have aduki beans mixed with black quinoa and cooked kombu seaweed (optional) and seasoned with unrefined sesame oil, gomasio (sesame seeds ground up with sea salt), and tekka (a condiment made from ground root vegetables and miso), topped with white turnips that have been cut into matchsticks and simmered with a splash of water, unrefined sesame oil, and tamari (wheat-free soy sauce) until the liquid is absorbed/reduced, and accompanied by a simple salad of chopped mizuna greens dressed with flaxseed oil, apple cider vinegar, and a sprinkle of sea salt. If mizuna greens are not available or desirable, arugula or watercress would work perfectly with this meal and are both easy to find.
This last one I don't have a photo for, but it is so easy and simple that it doesn't need one: cooked brown rice pasta (any whole grain pasta will do, such as whole wheat pasta or quinoa pasta) tossed with fresh basil, cooked kidney beans, sauteed arugula, sweet peas, olive oil, and garlic. This is comfort food at it's best and easiest!
I am looking forward to hearing which ones you try and how you make them your own; remember, once you have the basic proportions for health and balance in place, it's time to be creative and have fun with it!
Interested in finding out more about what foods are right for your own body and why? Looking for personalized information and support to help you change your eating and lifestyle choices in order to achieve your own specific goals for health and wellness? Contact me to set up a consultation: erica@wellnessrealized.com
Monday, March 14
Health: It's In Your Hands
Hi everyone!
It's been a busy few weeks here at WR, and it seems I have been absent from the blog for a while- but I'm back! With the return of Spring, it's a perfect time to refocus our efforts at staying balanced, healthy, and feeling great, and that means acknowledging how much that state of balance, health and happiness depends on our own conscious choices, practices, and patterns in our everyday lives. It isn't something that anyone else can do for us or force us to do. Our wellness is created by the choices we make in our lives: choices about how and where we spend our time and with whom, and choices about how we listen to and interpret the needs of our bodies; how we feed them, move them, and heal them when they are hurting.
We are the creators of our state of health and well being, and we have the power to recreate it and heal the areas that are hurting every day. Yet, so many of us shirk that responsibility, feeling that we aren't truly capable of taking care of ourselves in the ways needed to assure health and wellness; that it's too complicated, expensive, and too much work to take charge of our own well being. So we wait for someone else to tell us how to live, for an expert to confirm if what our intuition and common sense tells us is right, or in many cases, we just wait until a problem escalates and then expect a doctor to come in and fix, heal, and cure problems when we experience them. There is nothing wrong with seeking the help and advice of health professionals and doctors when we need information, support, and intervention when it comes to the healing of or dealing with a health related condition, but it is essential for us to realize that the true reality of our state of health comes down to what we choose to do, in our own time, in our own homes, with our own friends and families, on a daily basis, to take care of ourselves.
No matter how valiant the effort or how skilled and renowned a doctor or hospital is, we have to acknowledge that there is a limit to what medical intervention can do in the prevention and management of today's widespread health problems such as obesity, diabetes, and heart disease, as discussed in this New York Times Well Blog post on When Home Life Trumps Health Care, simply because of the fact that what we do when we go home on a daily basis is what creates the ongoing state of health or illness in our bodies, and those choices cannot be forced or even overseen by our doctors- it's in our own hands. Doctors and hospitals can surely help you immensely and even save your life, but when you go home and go back to your own daily routine, it's up to you to make the decisions and choices that are going to bring you health and wellness in the long haul.
And what about the other experts? Well, as I know all too well from the understandably confused and frustrated first-time clients who come into my office and from my own time spent in the field, there are a LOT of conflicting opinions out there, and a lot of just plan bad information. My best advice? First, tune in to yourself: become focused and quiet, and ask yourself, right now, what you feel that you need in order order to bring more health and balance into your life. Do you need to be eating more vegetables and less fast food? Drinking less alcohol and more water? Do you need to be working fewer late nights and finding some more alone time for relaxation? Do you need to learn how to cook healthy, simple meals for yourself or your family? Do you need to take up a regular exercise routine? Do you need to learn how to food shop in a way that is inexpensive but still health-supportive and convenient? Do you need to begin to make and bring lunch to work in order to maintain energy throughout the day while also cutting expensive and unhealthy lunches out?
Then, ask yourself what supportive choices you need to be making in order to create that reality and actually make it real. Do you need to schedule in time in your weekly calendar to make planned food shopping trips so that your kitchen can be stocked for easy meal prep? Do you need to plan some social activities that revolve around something other than drinking and eating out? Do you need to enlist the help of someone to teach you how to shop for, prepare, and cook food that will be healthy and supportive for you while not breaking the bank or taking up all of your time? Do you need to re-organize your free time to include less procrastinating online and TV watching and more time enjoying of activities that bring you both joy and benefit to your emotional and physical health? Do you need to treat time to cook and eat as importantly as you treat your other obligations? Do you need to discover and implement, once and for all, an approach to eating and exercise that feels so natural and comfortable for you that you actually stick with it? It isn't as elusive as it sometimes seems, I promise- the key to maintaining health and wellness is answering the above questions for yourself with honesty, accepting your own responsibility in creating your state of health, and then making the choices, decisions, and rituals that ill support and sustain your own approach to health and wellness.
So, now what? Where do you go from here if you've answered the above questions and realized that between all of the conflicting advice out there and your own personal circumstances and challenges, you could really use some good solid information and some help in making these supportive choices and practices to create a new state of health and wellness? You'll need to call on someone to help and guide you that intuitively feels right to you; someone who provides you with the accountability that will help you in achieving your desired goals but who also possesses the awareness that your health, your body, and your wellness are ultimately your own creation- someone who will teach you a new way to live so that you can take care of yourself forever, rather than relying on an external system or person that ultimately cannot create or sustain your health and wellness for you. We all benefit immensely from help, support, information, tips, tools, and guidance, and those resources are available from professionals such as myself and many others who provide our clients with the beginning of a new relationship with health and wellness. The help obtained from these resources, however, can only be realized to its full potential when we are taking responsibility for how we live our own lives once we go home, and that means taking the initiative and prioritizing our needs for what will balance and sustain our state of well being.
If you realize that you have become an inactive participant or even just an onlooker in your health and wellness care (or lack thereof), it's time to take it back. I can tell you from plenty of professional and personal experience that it is what we do in day to day life, the choices we make for our own bodies, hearts, and minds, that creates wellness. It is what and how we eat, it is when and how we make time for ourselves to relax and unwind, it is if and how we express our emotions, how much we joyously move our bodies, and especially how we listen to our bodies when they are alerting us to something that is wrong and act accordingly. Pain , illness, disease and discomfort are all signals from the body that it is time to pay attention and make a change, and time to take action to bring back balance- we have the power in our own hands to do so. I am here to help you with ongoing information, support, and practical and natural tools for optimal nutrition and wellness according to your own unique needs, and will do so in a way that grows and fosters your ability to truly take care of yourself in your own life and by your own hands...please contact me at erica@wellnessrealized.com if you are interested in my help.
Your health is in your own hands: Hold onto it!
Interested in finding out more about what foods are right for your own body and why? Looking for personalized information and support to help you change your eating and lifestyle choices in order to achieve your own specific goals for health and wellness? Contact me to set up a consultation: erica@wellnessrealized.com
Wednesday, October 27
Amaranth and Apple Porridge with Chopped Pecans
 I have spoken before on the joys, wisdoms, and powers of a whole grain breakfast including how to work with whole grains in their original form to make nutritious and delicious grain porridges. This recipe is a perfect example, and it was the perfect fix for the cold, grey, drizzly day when I recently made it. What we eat for breakfast sets the tone for the whole day, both physically and emotionally, so make sure you get off to the right start with a meal that is grounding, full of the nutrients your body needs for your busy day, and soothing and comforting to boot.
Amaranth is a lesser known but stellar whole grain that is similar in appearance, taste, and nutritional profile to a tiny version of quinoa, although the consistency and texture when cooked is more like grits. It is packed with minerals and is higher in protein and calcium than milk, while containing the magnesium and silicon essential to support calcium absorption. This tiny, tasty treat is one of my favorite things to cook in The World's Tiniest Kitchen.
Amaranth and Apple Porridge with Chopped Pecans
makes 2-3 servings (can be reheated on the stove for subsequent days)
2/3 cup uncooked amaranth (available at natural food stores)
2 cups fresh water
1 medium apple
4-6 tablespoons chopped raw pecans, plain (or 2 tbsp per serving)
cinammon
agave nectar, raw honey, or pure natural maple syrup
unsweetened almond milk
sea salt
Wash the amaranth carefully with your hands in a medium sized pot with plenty of water. The tiny grains will stick to your hands a bit, but just keep rinsing them off in the water. Then drain the amaranth carefully through the finest mesh sieve- you will need this, otherwise the tiny grains will slip through the holes of your strainer- and rinse well. Transfer the washed amaranth back into the pot with 2 cups of fresh water. Wash, core, and chop the apple into small pieces, and add to the amaranth in the pot. Bring to a boil uncovered, then immediately turn down to low, cover, and simmer covered for 20 minutes or so. Check the consistency and give a stir- it is done when the apple is soft and the grain has absorbed the water and turned to a grits-like consistency. If the grains are appearing wet on top but sticking to the bottom of the pan when you try to stir, turn the heat off and leave the porridge to sit covered on the stove for another 5-10 minutes. The steam and moisture will unstick the grains on the bottom. Now you're ready to dress it up!
 This recipe makes 2-3 servings, so either portion out what you want for yourself and save the rest to reheat on the stove for the next day or two (when reheating add a little extra water if necessary), or portion into 2 to 3 bowls for yourself and your breakfast companions. Top each serving with 2 tbsp. chopped pecans, a healthy shake of cinnamon, a very light swirl of either agave nectar, raw honey or pure maple syrup (remember the porridge is already sweetened by the cooked apple, so you don't need much) and a subtle sprinkling of sea salt to balance the sweetness and bring out all the flavors. You're ready to spoon into some heavenly Fall in a Bowl! But...
For the final act, if you are so inclined, you can top it off with a gentle pour of unsweetened almond milk, which gives an extra creamy and smooth texture to this already comfortingly soft and sweet dish. It's delicious with it, but perfectly adequate without- chef's choice!

Interested in finding out more about what foods are right for your own body and why? Looking for personalized information and support to help you change your eating and lifestyle choices in order to achieve your own specific goals for health and wellness? Contact me to set up a consultation: erica@wellnessrealized.com
Tuesday, October 26
Tortilla Bean Casserole and Arugula Salad with Golden Beets and Artichoke Hearts
 I think we can all universally agree that once the wind starts blowing and the leaves start falling, it's time for comfort food! Well, it's always time for comfort food, but this is the time of year when we start to yearn for something warm and hearty; something deep and flavorful that's been baking in the oven or simmering on the stove. In the World's Tiniest Kitchen, that means it is time once again for Tortilla Bean Casserole.
I have a warm spot in my heart (and my stomach) for Tortilla Bean Casserole, because it is one of the first dishes I created back when my husband and I first moved in together and I was learning the ropes of how to cook for two people who had somewhat disparate food habits, while also sticking to a conservative budget and not spending too much time in the kitchen (this was when The World's Tiniest Kitchen itself was also new to me, I had to adjust).
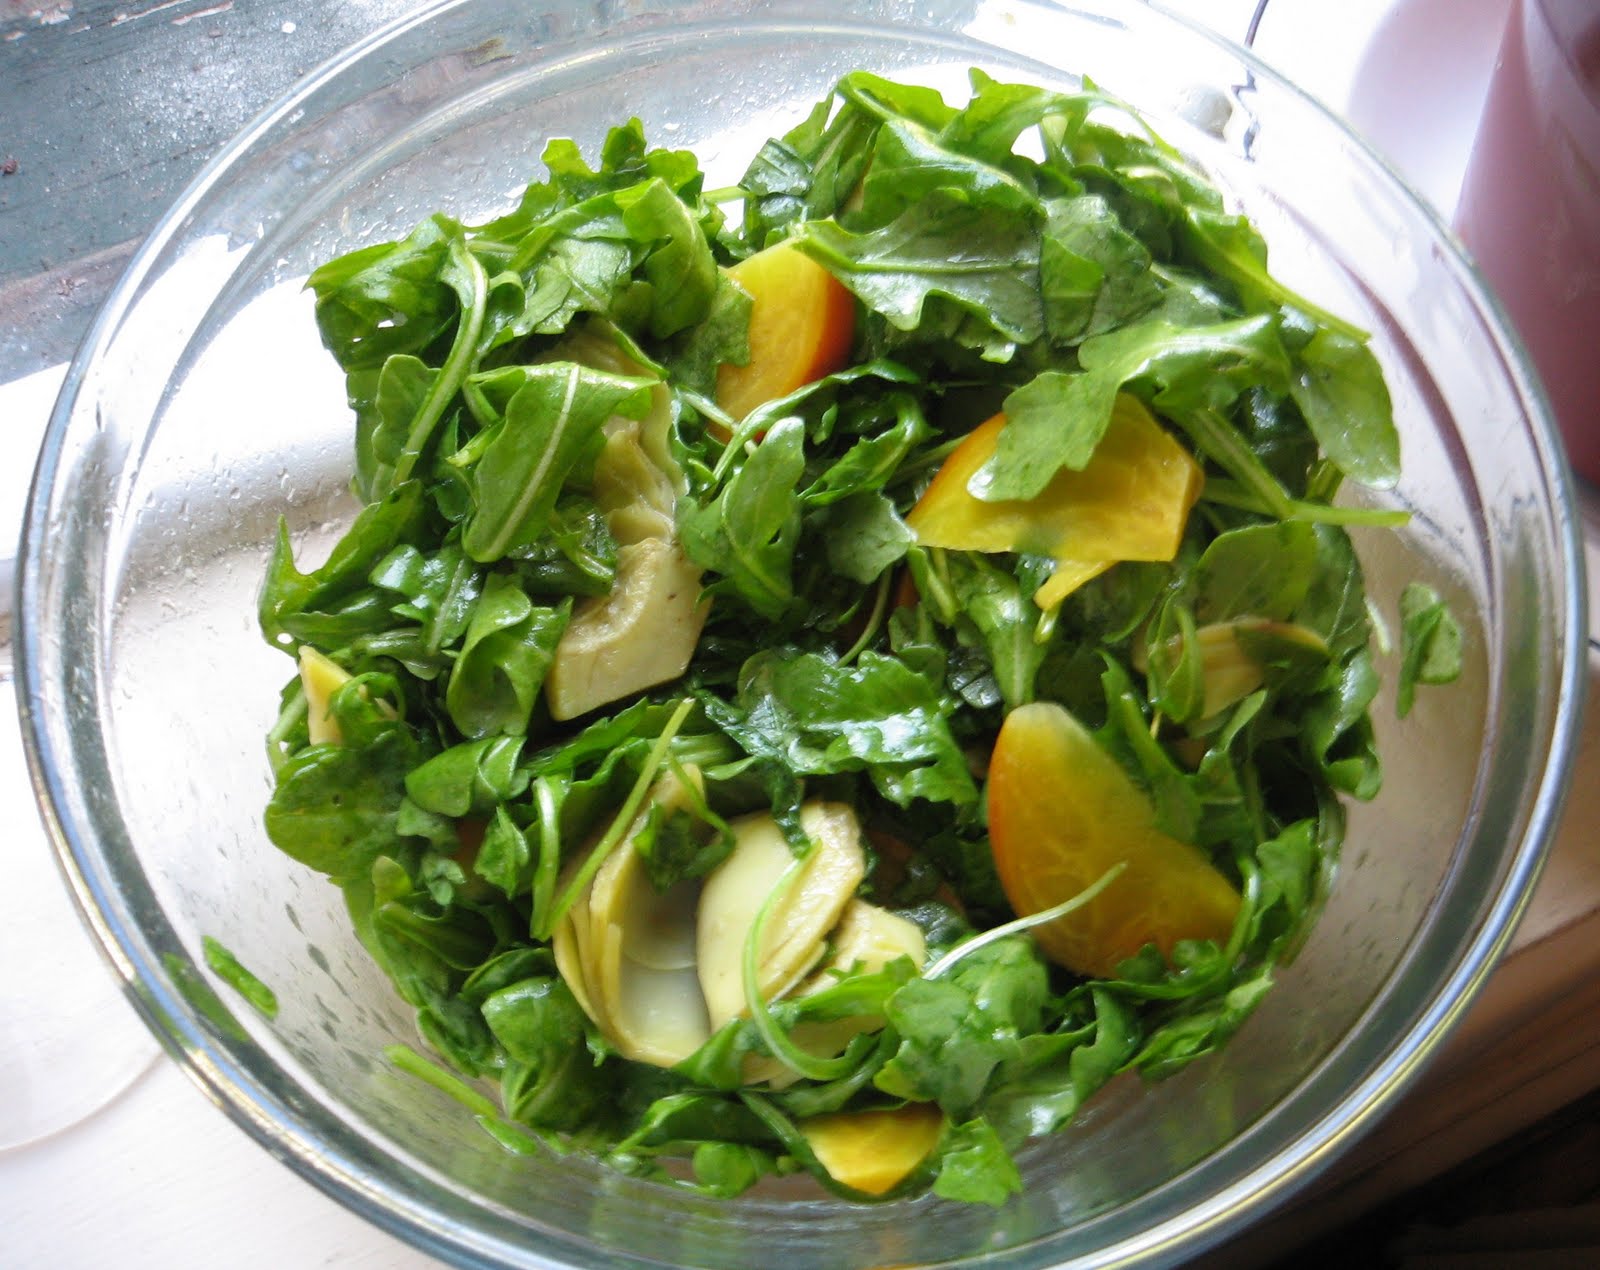
Enter Tortilla Bean Casserole. I like to call it a Crowd Pleaser, which in my book means any dish I can bring to an extended family gathering or a potluck dinner with friends where I won't get the "oh, more healthy stuff?" routine because it'll be gobbled and gone before anyone thinks to raise an eyebrow. It's also super easy, so it's a great recipe for anyone who doesn't have much experience in the kitchen. Today was the perfect day to cook up a big pan of this dish, and for a light and refreshing contrast, I served it with my Arugula Salad with Golden Beets and Artichokes, recipe below.
Tortilla Bean Casserole
serves 6-8
2 cups uncooked beans, either kidney and black beans or kidney beans and black eyed peas
(canned beans can be used if necessary, see note below on cooking beans)
1 package sprouted grain corn tortillas (ex: Food for Life brand, available at health food stores)
1 jar all natural, low sodium/no salt added tomato sauce
1 1/2 cups organic frozen sweetcorn
1 large onion
2 tbsp olive oil
Spices:
Garlic Powder
Chili Powder
All Spice
Sea Salt
Black Pepper
Soak, wash, and cook beans according to instructions on how and why to cook your own beans here. If using canned beans, you will need at least 2 cans of each kind of bean (4 cans total), and be sure to rinse them well in water. Once beans are ready, set aside. Chop the onion into small pieces, place in a saute pan with tbsp olive oil, and saute over medium -low heat until fragrant and translucent. Set aside. In a large saucepan, heat the jar of tomato sauce over medium heat until slightly bubbly, add the beans, corn, onions, 1 tsp. chili powder and 1/2 tsp. garlic powder, a sprinkle of allspice, sea salt, and black pepper. Simmer on medium to low heat for 15-20 minutes minutes. Taste and adjust seasoning.
Preheat the oven to 375 degrees. In a roughly 10" x 13" casserole pan, ladle about 1/3 of the bean mixture into the bottom and spread it out to form one thin, even layer across the bottom of the pan. Top with one single layer of the corn tortillas, covering the entire surface but not overlapping much- tear them into pieces when you need to cover smaller areas. Then top that with another 1/3 of the bean mixture spread into a thin, even layer, and top that with another solid single layer of tortillas. Spread the remaining 1/3 of the bean mixture over the tortillas in an even layer, and top with the last layer of tortillas. You now have 3 alternating layers of each, and the package of tortillas should provide just enough. Press the top layer or tortillas down a little so that they get "wet" with sauce on one side, and then turn them over and re-layer them with the other side facing down so that the top is now moist. Drizzle this top crust of tortillas with 1 tbsp olive oil and use the back of a spoon to spread it evenly to coat each tortilla. For an extra kick, I also drizzled the top layer with a tiny bit of cider vinegar-based all natural barbecue sauce left over from a trip to North Carolina, if you want to get crafty and try that! Otherwise, you're ready to go. Place in the oven and bake at 375 degrees for 30-35 minutes, until it looks like this:

Mmmmmmmmmmmm......sizzly.
Cut into square pieces as you would lasagne and remove each serving from the pan carefully with a spatula. This makes enough for 6-8 people and is GREAT as leftovers (add some additional tomato sauce when reheating if leftovers seem dry); it freezes well, too, so don't worry if you're making this for just one or two people- plenty to freeze and heat up another time! According to my husband, it tastes best when reheated as leftovers, and that fact plus it's easy transportability makes this is a perfect bring-leftovers-for-lunch meal. Throw some veggies on the side and you're all set!
Speaking of veggies, I served it with....
Arugula Salad with Golden Beets and Artichoke Hearts
 3-4 cups baby arugula
8 pieces frozen artichoke hearts (or roughly 2 large whole artichoke hearts quartered, if using fresh)
1 medium/small golden beet
olive oil
cider vinegar
sea salt
pepper
Wash arugula and spin dry in salad spinner or pat dry with paper towel, place in a salad bowl with room to toss. Scrub beet well, remove rough top, and trim any tough skin around the top, along with the skinniest part of the root if still attached. Cut in half lengthwise and then into small half-moon segments as shown in photo. Place into a shallow saute pan with 1 inch water (along with artichoke hearts if using frozen), bring to a boil, turn to medium heat and simmer for 7-8 minutes. (If using fresh cooked artichoke hearts, cook beets alone). Drain and cool beets and artichoke hearts, toss in with arugula. Drizzle with olive oil and cider
vinegar, a sprinkle of sea salt and pepper, and toss well to coat.
Voila!

This salad is the perfect light, simple, and refreshing accompaniment to the warm, dense layers of the tortilla casserole, but it can be served alongside any dish you like.
So there you have it...a delicious Fall meal, from the World's Tiniest Kitchen to your table. Pull up a seat and dig in!

Interested in finding out more about what foods are right for your own body and why? Looking for personalized information and support to help you change your eating and lifestyle choices in order to achieve your own specific goals for health and wellness? Contact me to set up a consultation: erica@wellnessrealized.com
Friday, October 22
How, and Why, to Soak and Cook Your Own Beans

There's always a pot of beans soaking or cooking in The World's Tiniest Kitchen, and if I can do it here, trust me- you can do it anywhere! Cooking your own beans is easy, the most nutritious choice, cheaper by a long shot than buying canned beans, and despite popular belief, it's not actually time consuming. "Time consuming" means that something is taking up your time or taking time away from other tasks, and when it comes to soaking and cooking beans, it's rather a matter of very short periods of actual time spent interspersed with long periods of time when the beans are doing all the work and you don't even need to be in the room. So when you're ready to make that step and see just how easy, cheap, and deliciously nutritious homemade beans can be, read on!
Let's start with the why: when it comes to the intrinsic energy and quality of our food, we always want to consume food that is as close as possible to it's original state, when it came from the earth. Dried beans have simply been dried in their natural state and then sold- no salt or other preservatives, no chemicals or additives or flavorings, and no sitting around in liquid inside a can for long periods of time. Because they exist in this simplest of states and nothing has been added to them or done with them, they are also very cheap to buy in comparison with canned beans. You buy them in bulk, store them in airtight containers in a cupboard or on a shelf, and they last for months and even years! Aside from that, home cooked beans are easier to digest because the process of soaking and careful cooking descreases their gas-causing tendencies, so if you've experienced gas or indigestion with beans in the past, it's time to give home cooked beans a try.
And now for the how: simply measure out the dried beans you want to use depending on the recipe or use you have in mind, figuring that one cup of dried beans will feed about 3-4 people or servings. Place them in the bottom of a pot or bowl that has a lid, and cover them with plenty of fresh lukewarm water (at least twice as much water to beans). Add in either a bay leaf or a small strip of kombu seaweed (available at health food stores and Asian markets) to help break down the gas causing components of the beans, and nestle it under the beans. Cover with the lid, and leave for 8-10 hours. An ideal time to do this is either before you leave for work for the day so you can cook them when you get home, or before you go to bed at night so you can cook them the following morning or afternoon. Work and sleep are chunks of time already in your day when cooking prep like this can be happening on the side, with no effort! The time of soaking doesn't have to be exact- if you soak them for a little bit less than 8 hours or longer than 10 hours, that's ok, but don't soak them for up to 24 hours or more because they will start to sprout. During the soaking time, you don't do anything with them at all, you can be sleeping or not even home- meaning it takes less than 5 minutes total to measure them out, add water and a bay leaf or kombu strip and cover them, and you spend the next 8-10 hours the way you would anyway. See? Not bad so far.
After they've soaked 8-10 hours, drain them in a collander, discard the soaking water, and rinse them very well with fresh water. Reserve the bay leaf or kombu strip for cooking. Place the bay leaf or kombu strip at the bottom of a large pot with a heavy lid (enamel or cast iron pots work well), and top with the soaked washed beans as well as 3 times the amount of water per the amount of dried beans when you started, i.e. 3 cups of water if you started with one cup of dried beans before you soaked them. Bring to a boil uncovered and leave to boil uncovered for 15 minutes, occasionally checking on them and skimming off any foam that has formed on the surface of the water, discarding the foam. The longer you soaked the beans, the less foam there will be, if any. Then turn down the heat to low, cover the pot with the heavy lid, and simmer for a minimum of 1 hour and up to 90 minutes, depending on the kind of beans you are using (some are harder) and how long you soaked for (longer soaking shortens cooking time).
During this time, you don't need to be in the room watching them; they're just bubbling away on the stove- so while 60-90 minutes sounds like a long time, you're not actively cooking during that time at all. You can be in the other room helping with homework or showering and dressing for the day and tidying the house or answering emails. It's not an exact science when it comes to the length cooking time (are you seeing the pattern here? beans aren't fussy!) - the beans are done when they feel very soft to the touch and to the bite, but not mush. This means a minimum of one hour, but remember that well cooked beans are much easier to digest, so if you are someone who has often had indigestion with beans in the past, go for the full 90 minutes.
When finished cooking, strain and proceed to use in your recipe. However if you are cooking the beans for multiple uses over the course of one to several days, keep them in their cooking liquid in a glass or ceramic container with a lid in the refrigerator and strain out servings as you need them- the liquid keeps them from drying out. Home cooked beans can be kept in the refrigerator for 3-4 days, and can also be frozen for use at a later time. They are wonderfully handy to throw into soups, stews, casseroles, stir fries, salads, and all types of home cooked dishes.
So all told, the process of making beans from scratch does take hours- but you're only actively cooking or working for about 30 minutes of that. Once you get the hang of it, you'll be amazed at how easy it is and how you don't even notice the time passing, because you're doing your own thing the whole time and the beans are doing the work!
You will find that between the soaking, the bay leaf/kombu strip, the skimming off the foam, and the long cooking time, the beans are much easier for your body to digest than the ones being cooked en masse by a food manufacturer and sealed into a can with preservatives. Not to mention that home cooked beans save you a ton of money, and are better tasting and more pleasing in texture than beans out of a can, and best of all, you're giving your body this food in its closest to original state, which is always ideal. Closest to the source is best of course!
(All of this being said, canned beans are convenient, and it's ok to use them when you need to- but it's best to make your own whenever you can. If you do need to use canned beans or would like to simply have a few cans on hand for times when you haven't gotten a chance to make your own, buy a brand such as Eden Organics, which uses a safe can lining, avoids preservatives and additives, and includes kombu seaweed in their ingredients.)
Interested in finding out more about what foods are right for your own body and why? Looking for personalized information and support to help you change your eating and lifestyle choices in order to achieve your own specific goals for health and wellness? Contact me to set up a consultation: erica@wellnessrealized.com
Monday, October 11
Upgrade your Oatmeal

So it's Fall again, and that's good news for Breakfast! Cooler temperatures mean that we are more inclined to seek something warming and hearty for breakfast, and the best bet for a hearty, healthy start to the day is a whole grain porridge. So why is this such good news? Because whole grains are one of the essential foods most lacking in the modern American diet, and they are absolute nutrition powerhouses- packed with protein, fiber, minerals, and energy, these grains are essential for everything from brain function to digestion to blood sugar regulation and energy maintenance. And what better way to start the day that with a bowl of such powerful goodness? I have given an all-purpose description and recipe for whole grain breakfast porridge here and also described a tasty version in the recipe for Breakfast of Champions , so check out those posts for how-to's on incorporating this healthy staple into your breakfast routine. The sky is the limit: you can use leftover cooked grains and add more water, you can cook the porridge from scratch in the morning, or you can cook it the night before and make enough for a few days at a time and just reheat a portion each morning if you find yourself strapped for time.
So what about the ubiquitous oatmeal? Most of you have had it, and many of you eat oatmeal on a somewhat regular basis as a healthy breakfast option. But, unfortunately, all oatmeal is not created equal. Cooking oats from their original state and eating them as a porridge will get you the same wonderful health benefits as the other whole grains described in the posts above, but simply microwaving up a packet of sugary, pre-flaked, preservative- and artificial flavor-laden oat bits isn't much better than reaching for a box of sugary, processed cereal. Many of my clients come to me and say they've been eating oatmeal, but using this quick-fix version because they don't have the time to make longer cooking oats, i.e. whole grain oats. But they find out from me soon enough that they are missing out, both on nutrition and taste! So luckily, I have a solution for them, and for you.
Steel Cut oatmeal, which some of you may already be familiar with, is not the hassle that you may think. Switching from the pre-flaked, processed and heavily sugared and flavored packets of oatmeal to plain steel cut oatmeal that you make yourself gains you the bounty of health benefits described above, while also delivering a much more satisfying, filling, and delicious breakfast. And don't worry, it won't be boring! Instead of banking on artificial flavors and sugars, you'll be sassing up your oatmeal with wholesome, natural toppings. But first, let's make the oatmeal:
Simply measure out 2-3 servings (each serving is 1/4 - 1/3 of a cup of dry steel cut oats), and wash well with warm water in a pot, rubbing the grains between your hands in the water for several minutes, then drain and rinse in a fine mesh sieve (this is essential for cooking with whole grains because it removes the phytic acid inherent in the grain). If you have the time to soak the oats for several hours before washing and cooking, even better, but washing well is fine- no excuses about not having time! Then, boil four times the amount of water to the total amount of oats (i.e. 4 cups of water for 1 cup uncooked oats, yielding 3-4 servings). Once the water is boiling, add the oats, turn down to medium-low and simmer for 30 minutes until a uniform, creamy, grainy texture. Done!
BUT, it gets better....I can hear you now saying "I don't have 30 minutes in the morning to cook breakfast!" and that's fine, many of us don't. But you don't need to miss out: simply switch the cooking time to the night before when you do have some free time, and then reheat on the stove in the same pot the next morning for breakfast, OR, try this nifty trick employed sometimes by myself and many of my clients: go through the initial steps above, but once the water is boiling and you add the oats, simply cover the pot and turn off the heat immediately, leaving the hot pot on the stove covered until morning. The oats cook themselves in that very hot water during the night, meaning no waiting 30 minutes for it to finish; by morning, it's done and simply needs to be reheated for 5 minutes in the same pot on the stove. You can make breakfast for the whole family this way! If you are just making it for yourself, you can still make enough for several servings and reheat on the stove for the next several days (3 days max).
Once you've got your upgraded oatmeal, proceed to the flavor station. Remember from the post on Going With the Grain that the ideal breakfast contains whole grain carbs along with protein and some healthy fat for long term energy and satiation, so a great topping for whole grain, home-cooked oatmeal is a spoonful of chopped nuts, toasted seeds like pumpkin or sunflower, or ground seeds like flax. To kick up the flavor, you can go sweet with a light drizzle of honey, maple syrup, agave or brown rice syrup, or try a sprinkling of dried fruit like raisins or dried blueberries instead. If you like it salty and want to experience how grounding and stabilizing a savory grain breakfast can be, sprinkle some sea salt or seaweed flakes. Be creative!
Once you try this version of the old favorite oatmeal, I think you'll be converted, and you'll see and feel the benefits in your body. Remember, if you try the cook-during-the-night version, this literally only takes minutes from your day! Isn't it worth it for a breakfast that is better in every way?
Interested in finding out more about what foods are right for your own body and why? Looking for personalized information and support to help you change your eating and lifestyle choices in order to achieve your own specific goals for health and wellness? Contact me to set up a consultation: erica@wellnessrealized.com
Thursday, September 23
Having Your Just Desserts
So with all of these tasty and healthy recipes, how about a little dessert up in here? You got it.
I'm not a baker. I'm a cook; a chef I sometimes like to think. But baking, and dessert making in general, just does not hold the appeal for me that cooking does. I'll whip up the occasional homemade dessert for special occasions, but it's rare. That being said, sometimes you want a little something sweet after your meal, without going into a lot of time and effort to get it. Enter the quick fix dessert.
See, it's common to want a little something sweet after a meal, and there's a reason for that: the sweet taste helps to move the energy of the liver to help you digest and assimilate your food. However, this does NOT mean we need dessert after every meal or even every day, and it does NOT mean you're going to help your liver OR your digestion if you dive into a big bowl of ice cream or a giant slice of cake. With desserts, as with meat, dairy, and animal food in general, and the more extreme foods like sugars, salts, fats, and alcohol, less is more and quality is the key. Go for desserts that are simple and only contain real, natural, unrefined ingredients, and indulge with a small amount rather than overloading your body with a dose of sweetness that will leave you feeling overly full and your body feeling imbalanced. When looking for desserts or making your own dessert recipes, great natural options to look for instead of refined sugar are agave nectar, honey, pure maple syrup, brown rice syrup, barley malt, and molasses. Also, remember that our desire for sweet food is meant to be satisfied by a small amount and not on a frequent basis; it's easy to go overboard, so keep portions small and remember it's about taste and satisfaction, not about filling up. You'll appreciate dessert more and balance your body more easily if you go for quality not quantity and savor that dessert indulgence a few times a week at most, rather than loading up on sub-par sweets every day.
So what to do when you're craving something sweet at home and want to follow the above guidelines but also enjoy an indulgence that's quick and easy? Read on for some fun Fall ideas for super quick, no sweat desserts that you can whip up with things you already have on hand.
Here's a super simple, quick and easy dessert that is creamy, sweet and a little spicy, and only packs 100 calories...making it a much better option than packaged "100 calorie" desserts on the market that are full of preservatives and sugars. This is a drink dessert, so you can sip it slowly and really savor it, and because it's liquid it gives you a cozy full feeling without filling you up too much. And it's also a healthier but still fun use for your martini shaker! Come holiday time, this is a great substitute for egg nog.
Almond Milk Frappé
1 cup natural unsweetened almond milk (skip brands like Almond Breeze with a lot of added sugar; many brands have some added sugar but the lower the better)
1/2 tablespoon agave nectar, honey, or pure maple syrup
several shakes of powdered cinnamon
2 ice cubes
In a beverage shaker, combine all above ingredients. Cover, and shake vigorously for 30 seconds. Strain into a large wine glass or fancy glass, and enjoy! For a slightly thicker consistency, blend all ingredients in a blender including ice, resulting in a frostier drink.
Want something chewy and cake-y instead of smooth and liquidy? Try this delicious treat, it's like a combination of the recently popular olive oil cake and a more traditional pound cake, but way less calories and fat and not even a fraction of the time to prepare: this is really easy breezy.
Sweet Sticky Salty Toast
1 slice Brown Rice Bread (chosen because of it's dense, uniform, "cake-like" texture)
honey
olive oil
sea salt
Lightly toast the bread until soft and just beginning to crisp on the outside, do not toast until dark. Once warm and toasty, baste one side of the bread with olive oil, or drizzle and spread with a knife. Next, drizzle honey over the same side of the bread and spread with a knife. Finally, sprinkle sea salt over the same side of the bread. Enjoy warm. Easiest thing ever, and boy is it delicious!
Wanting something crunchy and more textural, with a nice dose of fruit and richness? Got you covered:
Happy Trails Dessert Mix
2 tablespoons plain almonds, pecans, or walnuts, or a mix
2 tablespoons raisins, dried cranberries, or dried blueberries
1/2 tablespoon sesame seeds
honey, maple syrup, agave nectar, or brown rice syrup
1 teaspoon olive oil or sesame oil
light sprinkle sea salt (optional)
serve with:
100 % natural applesauce, store-bought or homemade (optional)
or
Apple slices (optional)
Heat 1 teaspoon olive or sesame oil in a small skillet over medium-low heat, do not boil or bubble oil. Add nuts and dried fruit and saute a few minutes, until nuts start to brown and dried fruit starts to puff up. Remove from heat, transfer into a tiny dish or fancy cup, and drizzle with natural sweetener of your choice from recipe list above (remember the dried fruit is already providing sweetness, so you don't need much sweetener). Sprinkle with sesame seeds, and small sprinkle sea salt if using, and enjoy! This mixture is delicious on it's own, or it can be used as a topping for a small bowl of applesauce, or spooned onto thin slices of fresh apple.
So there's a few quick and tasty options for easy desserts when you want something delicious and healthy without getting the oven involved. Happy Eating!
Interested in finding out more about what foods are right for your own body and why? Looking for personalized information and support to help you change your eating and lifestyle choices in order to achieve your own specific goals for health and wellness? Contact me to set up a consultation: erica@wellnessrealized.com
Tuesday, September 21
Millet Risotto with Basil, Shiitake Mushrooms, and Garlic String Beans
Perhaps you're thinking, "didn't we just see a recipe with a few of these ingredients?" Necessity is the mother of invention. In other words, having the "necessity" to use some vegetables before they lose their freshness and the "necessity" to get your butt into the kitchen and cook something fast because you waited too long and now you're very hungry are both inspirations to invent something new on the spot for your next meal. In today's example, I wanted to use up the shiitake mushrooms and fresh basil from last week's recipe for Tofu, Arugula, and Shiitake Mushroom Sauté before they passed their peak, and I also found myself in the position of being rather hungry and needing to decide what to make fast, not having done any prep work. Fear not, this is not a disaster situation! Merely time to whip up some kitchen magic on the fly.
Using a certain grouping of ingredients more than once in a given period of a few days is a great way to take some of the reinvention work out of cooking and also a smart way to cut down on the amount you have to shop for at once, while also making sure than the beautiful food you have bought won't spoil and go to waste. And it doesn't mean that the dishes you make using a particular grouping of ingredients has to taste the same just because it has some of the same things in it, as this recipe will illustrate- that would be boring, and we don't like boring.
People generally associate risotto with being a creamy, indulgent dish, and this is- but by changing up the cooking method a little bit and using less oil in combination with whole grain millet instead of white rice, it packs in much more nutrition and much less fat than a standard risotto without losing any of the flavor, texture, or indulgence! For the string beans in this meal, I used wax beans (one of several versions of green bean, yellowish in color and sweet in taste) that I purchased at a farmer's market upstate, which worked particularly well, but you can use regular green beans too.
Millet Risotto with Basil, Shiitake Mushrooms, and Garlic String Beans
Serves 2
1 bunch string beans (about two large handfuls)
1 cup chopped shiitake mushrooms, cut into in small pieces
3-4 large fresh basil leaves (more if leaves are small) torn into small pieces
1/2 cup dry uncooked millet
2 tablespoons olive oil, with some extra
sea salt
garlic powder
dried thyme
fresh ground black pepper
Sauté mushrooms in a saucepan with 1/2 tablespoon olive oil and a small splash of water over medium-low heat until they brown and shrink in size. Turn heat off and set aside. Wash millet well in a bowl of water and drain using a fine mesh colander or seive (using a regular colander will result in millet grains washing away through the holes). Combine the washed millet with 1 and 3/4 cups water in a saucepan. Bring to a boil, add shiitake mushrooms, torn up basil, a sprinkling sea salt and a few pinches of dried thyme, then cover and turn down to simmer over low heat for about 10 minutes.
Meanwhile, trim and wash string beans and set in covered skillet with 1/2 inch of water in the bottom, bring to boil and turn down to medium-low heat to simmer steam for about 8 minutes (check a bean part way through- you want them to be juicy and chewable but still firm, not tough and fibrous or limp and mushy). Drain string beans and set aside. Uncover millet mixture, add 1 tablespoon olive oil, stir well, cover again and leave simmering over low heat for another 10 minutes. (At this point when you've added the additional oil, mixture should be looking creamy and still "wet" with the water. If not, add a little more water along with the olive oil before covering to simmer for the last 10 minutes.)
While risotto is finishing, transfer string beans from the colander back to their skillet, drizzle with 1/2 tablespoon of olive oil, a sprinkling of sea salt and a light dusting of garlic powder and stir around to coat. After 10 minutes is done, check millet- the consistency should be very creamy, like that of risotto; if so, it's done. If not, add very small amounts of olive oil and water and continue to simmer until creaminess is achieved; this is why using correct amounts of water in the earlier stages of cooking is a time saver here and results in a more consistent dish. When ready to serve, warm string beans lightly over medium-low heat. Place risotto into mounds on two plates, and serve beans alongside on the plate.
This meal came together in less than 30 minutes with no prep time and no plan in place beforehand...and it was marvelous! All it takes is a little imagination...enjoy!
Interested in finding out more about what foods are right for your own body and why? Looking for personalized information and support to help you change your eating and lifestyle choices in order to achieve your own specific goals for health and wellness? Contact me to set up a consultation: erica@wellnessrealized.com
Monday, September 20
Tiffins and Such: Bringing Ease to Homemade Lunches and Portion Control
So now you may be thinking, "Excellent, I'm looking forward to trying all of these fabulous recipes for wholesome, natural, homemade food and bringing some of them to work for lunch....but how exactly do I transport a Tofu, Arugula, and Shiitake Mushroom saute to my office? Or any number of the other dishes you post recipes for?" Well, you can use any food storage container you have around your home, of course, but convenience and practicality are very important here, so I recommend some variation on the "tiffin" or something similar to it.
What on earth is a "tiffin" you ask? Tiffins come from India, and they're basically just stackable metal food containers that snap together, keeping food items separate but compact and resulting in ease of transportation and enjoyment. Because the containers are usually made of stainless steel, they won't discolor, crack, peel, or leach nasty chemicals into your food. They look like this:

Many other cultures have similar items that are used for transporting and portioning food, such as the Japanese bento box, usually made of lacquered wood or smooth enamel:

These days, you can find variations on this idea made from non-leaching quality plastic that does not contain BPAs, such as the handy ones from Sistema available in a multitude of shapes sizes that are divided into sections:

The main idea here is convenience and compactness, of course. You don't need to be fancy. But having something reliable and purposeful readily available for you to pack your lunch into each morning (or the night before, you go-getter!) really makes the idea much more manageable. No more rooting around through drawers of mismatching Tupperware lids and bases, most of them scratched and yellowed with age, or saving up those flimsy plastic take-out containers. Not to mention these handy options described above are made from materials that won't leach dangerous substances into your food; something we want to be aware of.
Now onto portion sizes...these handy dandy containers serve another function (you knew I was going to get there....) The thing is, sometimes we need some help adjusting to what an appropriate portion is given the distortion that we've been exposed to. Ultimately, the very best gauge of portion is trusting the needs of our own body, because people are different and sometimes we need more food and energy than other times. However, when we are learning to trust our body in this way, and when we are still in transition from the Portion Distortion of our culture to a more mindful awareness, we can use a little help. These pack-and-go containers can make it easier for us to stick to proper portions because they are designed to be compact and taken on the go, AND because they are divided into sections already, or "portions" if you will. Let's say, for example, that you have a tiffin with four equal sized compartments: fill one with your starch (like brown rice, quinoa, or soba noodles), one with your protein(like black beans, tofu, or fish), and the other two with a different vegetable each (like kale and carrots, or brussels sprouts and artichoke hearts) . Or maybe you get a Sistema plastic container divided into three sections; one larger, two smaller. The larger section if for your "entree", perhaps a cooked dish like a recipe I have posted, or a nice salad with protein and grains in it, or even a sandwich, and then the two side compartments can be for additional veggies, fruit, nuts...you get the idea.
It's rare than I advise people to buy food-related tools or extra "stuff", because I firmly believe that making positive, life changing shifts to a healthier and more balanced diet and lifestyle doesn't require anything fancy, expensive, or complicated...however, there are some times when a small and simple investment brings back significant long term gains, especially when it comes to ease and convenience. One example: a vegetable steamer. Another example: a handy dandy grown up lunch box. So consider it, especially as you try many of the recipes I've been posting. Both your work bag AND your waistband should be feeling roomier in no time....
So where do I get one of these? It depends on where you live; in some cases ordering online may be easiest- Amazon.com sells a large variety of tiffins, Sistema plastic containers, and even bento boxes, and they can ship anywhere in the world. Or simply do a online search for any of the above items and find a vendor near you. Many cooking stores will stock this type of thing. For example, New Yorkers: in Brooklyn, visit A Cook's Companion on Atlantic Avenue for tiffins and Sistema, and in Manhattan, visit Broadway Panhandler or Pearl River Mart. They won't be hard to find, and they aren't pricey. Happy packing!
Interested in finding out more about what foods are right for your own body and why? Looking for personalized information and support to help you change your eating and lifestyle choices in order to achieve your own specific goals for health and wellness? Contact me to set up a consultation: erica@wellnessrealized.com
What on earth is a "tiffin" you ask? Tiffins come from India, and they're basically just stackable metal food containers that snap together, keeping food items separate but compact and resulting in ease of transportation and enjoyment. Because the containers are usually made of stainless steel, they won't discolor, crack, peel, or leach nasty chemicals into your food. They look like this:

Many other cultures have similar items that are used for transporting and portioning food, such as the Japanese bento box, usually made of lacquered wood or smooth enamel:
These days, you can find variations on this idea made from non-leaching quality plastic that does not contain BPAs, such as the handy ones from Sistema available in a multitude of shapes sizes that are divided into sections:

The main idea here is convenience and compactness, of course. You don't need to be fancy. But having something reliable and purposeful readily available for you to pack your lunch into each morning (or the night before, you go-getter!) really makes the idea much more manageable. No more rooting around through drawers of mismatching Tupperware lids and bases, most of them scratched and yellowed with age, or saving up those flimsy plastic take-out containers. Not to mention these handy options described above are made from materials that won't leach dangerous substances into your food; something we want to be aware of.
Now onto portion sizes...these handy dandy containers serve another function (you knew I was going to get there....) The thing is, sometimes we need some help adjusting to what an appropriate portion is given the distortion that we've been exposed to. Ultimately, the very best gauge of portion is trusting the needs of our own body, because people are different and sometimes we need more food and energy than other times. However, when we are learning to trust our body in this way, and when we are still in transition from the Portion Distortion of our culture to a more mindful awareness, we can use a little help. These pack-and-go containers can make it easier for us to stick to proper portions because they are designed to be compact and taken on the go, AND because they are divided into sections already, or "portions" if you will. Let's say, for example, that you have a tiffin with four equal sized compartments: fill one with your starch (like brown rice, quinoa, or soba noodles), one with your protein(like black beans, tofu, or fish), and the other two with a different vegetable each (like kale and carrots, or brussels sprouts and artichoke hearts) . Or maybe you get a Sistema plastic container divided into three sections; one larger, two smaller. The larger section if for your "entree", perhaps a cooked dish like a recipe I have posted, or a nice salad with protein and grains in it, or even a sandwich, and then the two side compartments can be for additional veggies, fruit, nuts...you get the idea.
It's rare than I advise people to buy food-related tools or extra "stuff", because I firmly believe that making positive, life changing shifts to a healthier and more balanced diet and lifestyle doesn't require anything fancy, expensive, or complicated...however, there are some times when a small and simple investment brings back significant long term gains, especially when it comes to ease and convenience. One example: a vegetable steamer. Another example: a handy dandy grown up lunch box. So consider it, especially as you try many of the recipes I've been posting. Both your work bag AND your waistband should be feeling roomier in no time....
So where do I get one of these? It depends on where you live; in some cases ordering online may be easiest- Amazon.com sells a large variety of tiffins, Sistema plastic containers, and even bento boxes, and they can ship anywhere in the world. Or simply do a online search for any of the above items and find a vendor near you. Many cooking stores will stock this type of thing. For example, New Yorkers: in Brooklyn, visit A Cook's Companion on Atlantic Avenue for tiffins and Sistema, and in Manhattan, visit Broadway Panhandler or Pearl River Mart. They won't be hard to find, and they aren't pricey. Happy packing!
Interested in finding out more about what foods are right for your own body and why? Looking for personalized information and support to help you change your eating and lifestyle choices in order to achieve your own specific goals for health and wellness? Contact me to set up a consultation: erica@wellnessrealized.com
Friday, September 17
Sandwiches...When You Want Something You Can Wrap Your Hands Around!
I have a lovely, wonderful friend named Shannon, with whom I was a roommate in college. One Saturday, when discussing what she was going to eat for lunch, Shannon said she needed to eat "something she could wrap her hands around". This is a sentiment many of us can relate to (I certainly can), and was well put. She knew a fork and knife weren't gonna cut it this time. My husband is also an enthusiastic lover of sandwiches, as are many people, and it's easy to see why....what's not to love about two pieces of bread brimming with all sorts of tasty trimmings that you can deliver by hand right into your own mouth?
So. There's been a lot of me posting my recipes on here lately and lots of talk about bringing lunch to work and making time in the day for a more relaxed, substantial meal. Worry not, this does not mean we aren't showing love to sandwiches. It's simply a matter of re-imagining your standard sandwich, making some small but worthwhile changes, and getting back to the good stuff....and after trying these substitutions and sandwich ideas, I don't think you'll mind.
Let's start with the basics. Most people envision a sandwich to mean bread, some kind of meat, often cheese, *maybe* lettuce and tomato, and some kind of condiment like butter, mayo, mustard, ketchup, etc. Your standard deli sandwich. Now let's take that model and, without getting too fancy or complicated, turn it into a healthier, more wholesome meal.
First of all, swap out the white or flimsy whole wheat bread for some good, hearty, whole grain bread. It's out there; and it's more substantial and better tasting than the alternatives, not to mention much better for your body. When buying bread, read the ingredients to see what is in it: First of all, skip enriched flours, often listed as the first ingredient. "Enriched flour" means the manufacturer added in vitamins and minerals to make up for the fact that the flour was refined in the first place, thus stripping away these natural essential elements from the grain. Sound counter-intuitive, wasteful, and ridiculous? It is. But you don't have to settle for that- look for whole grain flour, simple as that. Next, look at what sugars, additives, and preservatives are in the bread- you want to keep it simple, bread is an old-fashioned ad straight forward food. You want to see that WHOLE GRAIN is the main element. Buying wholegrain bread from a local bakery helps to cut down on the unwanted stuff, but if that's not an option, your grocery store has better choices too. Do the best you can. Look for nutrition labels that show the most fiber, protein, and minerals while STILL having a simple and basic ingredient list. You don't want them just adding THAT stuff in, either. Keep it real. Real food, real simple.
Next, fillings. If you're going to use meat, get the best quality you can. (And if you're not a meat eater, skip to the next paragraph). Organic is always best when it comes to animal food, and even better if you can obtain it from a local source who can assure the quality and safety of the origin of the meat. If that's not an option, look for store brands like Applegate Farms that assure that the meat does not contain any added growth hormones or antibiotics, and in some cases that the animals were raised humanely. When it comes to amount of meat in the sandwich, less is more: when I make sandwiches for my husband or other people who want to eat meat, I use two thin slices. Two. Think that's crazy? Visit somewhere like Europe and see how much meat they put in their sandwiches. When it comes to protein, we do need it- but we don't need a mound like we get in most American sandwiches. Too much meat in proportion to vegetable food in the meal (and overall diet) results in bloating, constipation, and acid inflammation, not to mention worse...so try to make the switch and realize that when it comes to meat, Less Is More. If you're using cheese, same guidelines: organic whenever you can, or at least all natural good quality cheese, and less is more- one thin slice does the job.
So what are you going to do with all that room now that you've trimmed down your meat and cheese portions? Bring in the veggies. Lettuce and tomato are great, but why stop there? And why so little? Step it up! For greens, try arugula, spinach, or watercress (where I studied abroad in Scotland, sliced hard boiled egg with watercress on wholegrain brown bread was a popular sandwich), and add more volume than you used to. If using lettuce, use the darkest green possible. Slice up tomatoes, cucumbers, pickles, throw in some sprouts, sliced olives, radishes, avocado, or even a layer of cooked vegetables from your leftovers from the day before- why not? Go to town! You're reinventing the sandwich here, don't be shy. Let the veggies take the stage, and you'll be surprised how filling they can be! Also, especially because you're now using nutrient dense, fiber-full, protein-and-mineral-packing whole grain bread, your sandwich will be more filling and long-term energizing anyway, so you won't miss the larger portions of meat and/or cheese, and you'll be doing your body a favor by following the proportions of animal food to plant food that are best for health, digestion, and metabolism.
So what about the condiments, the icing on the cake? If you're like me, you love love LOVE condiments and sauces of any kind, and sandwiches are no exception. I was once told by an Irish person that is not my husband that the typical American refrigerator contains all condiments and no food. While I disagree about the no food part (or at least I hope/believe that is changing), I do agree that as a culture we have a love for the condiment...and we're not ashamed to show it, nor should we be! So feel free to use that affinity for sauciness to dress up your sandwich a bit, but here again, consider some restructuring. For example, if you're going to use higher fat and calorie condiments like butter or mayonnaise, use organic when you can and only use a little. With condiments, we're going for taste and sometimes texture, not bulk or substance, so we really don't need a lot- they're meant to be used sparingly. Next, make use of lighter options like mustard, vinegar, natural ketchup or barbecue sauce, olive oil, pesto, relish, horseradish, sesame tahini dressing, salsa, and many more to add punch, flavor and moisture. Avocado and tomato are particularly wonderful sandwich ingredients because they function as both filling and condiment- both add moisture, flavor, and texture- one creamy, one juicy. For a sandwich revelation and boost to your health, try swapping out cheese in your sandwiches for sliced avocado sprinkled with a little sea salt. It's creamy, fatty, rich, salty...all the things we want from cheese, but with healthier fat and fiber and protein to boot. Your heart will thank you, and your tummy won't mind a bit.
So that's how to reinvent the "standard" sandwich. Now are you ready to shake it up a little? Try skipping the meat....the vegetarians are already used to this, and know how satisfying meat free sandwiches can be. Try the following options as choices for the main filling: hummus, bean-and-grain burger (not processed soy burger), avocado, tofu, or tempeh. Then follow the steps above to pack the sandwich with filling, nutritious, satisfying veggies. Top with condiment combo of your choice, and voila!
Below are some examples of how this simple sandwich wizardry works, and some non-"typical" sandwich options that anyone can enjoy. Don't be afraid to let these balanced sandwiches become a new, healthier part of your foodscape!
Quality WHOLE GRAIN bread topped with...(remember always to UP the veggie portions!!)
-hummus, avocado, sliced tomatoes, cucumbers, mixed green lettuce, and bean sprouts
-bean and grain burger, sliced pickles, arugula, mustard, natural ketchup
-steamed tempeh, sauerkraut, sliced radish, tahini dressing, natural ketchup (kinda like a Rueben!)
-olive tapenade, avocado, sundried tomatoes, drizzle of pesto (less bulky, but more rich....great for a pizza substitute! Also can add spinach or arugula)
-2 slices of any lean meat, spinach leaves, shredded carrot and cabbage, drizzled with olive oil and vinegar.
-Sliced smoked salmon with capers, baby mesclun greens, and raw onion on olive-oiled bread dash of horseradish
-leftover cooked vegetables and beans from another meal thrown into a whole grain wrap, or even wrapped up in a large collard green or lettuce leaf as described in a recipe here
-one sliced hard boiled egg, watercress, sliced cucumber, and toasted pumpkin seeds, light smear of pesto if desired
-almond butter or sunflower seed butter, shredded carrots, raisins, and sliced apples (sound weird? It's awesome. You have the mother of a kid in my 5th grade class to thank for this one....I haven't forgotten!)
The list goes on and on....remember, just have fun with it and experiment. The whole idea of a sandwich is about putting things you like together in new combinations tucked in one handy package, so be bold and don't worry about messing it up...it's only a sandwich!
Interested in finding out more about what foods are right for your own body and why? Looking for personalized information and support to help you change your eating and lifestyle choices in order to achieve your own specific goals for health and wellness? Contact me to set up a consultation: erica@wellnessrealized.com
Subscribe to:
Posts (Atom)